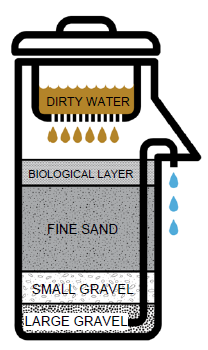
Treating stored rainwater, or surface water to make it potable
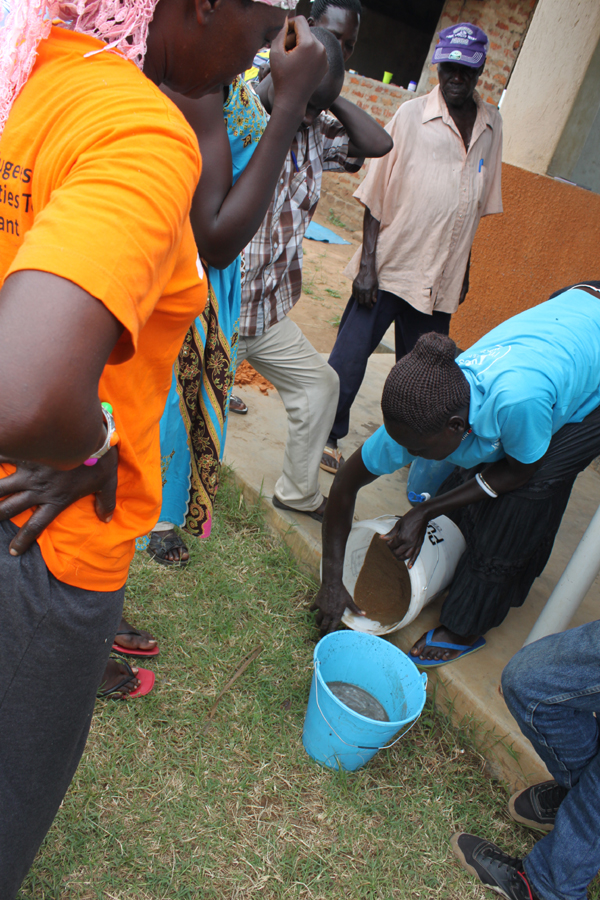
The training team in Homa Bay, at PermoAfrica were tasked with making a Bio-sand filter, from locally available components. This was what they achieved and a moment of celebration at the end of their 10 days at the centre.
There are many variations to this design but the principle is the same.
Make the water travel through and over a very large surface area
You can use sand, and maybe biochar also
The filter is alive and also includes beneficial bacteria that help clean the water
The resting water, at the surface (the top 5 cm) must be full of oxygen, to allow the beneficial microbes to thrive.
This is why the surface layer must be shallow and of 5 cm, allowing oxygen to penetrate and nourish the bio layer
Use 60 cm of the fine sand, you can also add a layer of biochar below it
The course sand and gravel at the bottom is to prevent the exit pipe becoming blocked by sand and allowing the water to flow freely
The spout must be the same height as the resting water, this is what sets the water level inside the bio-sand filter
In this example the case is made from cement, but this is expensive and a former is needed for construction, you can just as easily use other materials like plastic buckets, ceramic or other materials.
The bio-layer must never dry out, or become flooded, else you have to begin again to build up the microbial population.
POISONS, toxins or heavy metals are not removed by this method, always use caution, but this is a vast improvement on no treatment at all.
In this second image the principles sre the same but have been made from different materials
Standing water
Bio-layer of beneficial bacteria
fine sand 50-60cm
Finer gravel
larger gravel or stones
Exit pipe
Base
8 diffuser plate
lid
This is the same as theone pictured above in the principle of how it works. I this picture i looks like it has been constructed from different materials but so long as you follow the same principles it will work just as well.
Things to consider, the diffuser plate is there so when you add fresh water, you dont disturb the bio-sand layer
Again the height of the standing water is set by the height of the spout. As you add 1L of water through the diffuser plate it will displace the same volume of water through the spout
These 2 diagrams suggest some accurate measurements and give a clear idea how it works
Bio-sand filter on a bigger scale
The image below shows how you can connect a serious of barrels or tanks together to treat more water and also to increase how effective the filter is. You can imagine the more surface area the water flows over, the more it will be filtered and become clean.
When you first build you bio-sand filter wash the sand and gravel and the container well.
Three short videos explaining simply how it works and how to maintain it.
A pictures from the version we constructed in the refugee training sessions in 2018
Washing the sand
and washing it again
connecting the outlet pipe
Testing our home made bio-sand filter
The water was muddy still from the dirty sand, after sending the same water through the filter a few passes, each time it came out cleaner, until it was crystal clear
Bio-sand in Nateete - Munanura James leading his youth project
Team in Nateete, Kampala, Uganda making a home made bio-sand filter. Led by Munanura James with support from Sector39
BSF made at home in Wales
This has been an interesting experiment at home. We purchased a rubberized refuse bin for £13 and some basic alcathene pipe and joints from the hardware store. Also three bags of sharp sand. We layer pebbles and biochar in the base for free drainage leaving room for 60 cm of sand.
We add water through the sieve which has holes of about 2,mm so that the new water does not disturb the sand layer. For the firs week the water came our muddy, even though we had washed the sand an gravel as best as we can. I have been circulating the same water for a few days now and each time i do that it looks noticeable clearer.


You must be logged in to post a comment.